Have you been wondering, “How the heck should I be using ClickUp Rollups?” 🤔
You’re not alone! In this video, we’re going into our ClickUp account to show you exactly what a Rollup is, how to create them, and four example use cases you can start implementing today!


Not a video person? No problem! We’ll cover all the main points in this article.
Do you think ClickUp Rollups are confusing?
Let’s face it: Rollups are confusing!
The only thing that could make it even more confusing is the actual tool we use. Unfortunately for us, that is the case with ClickUp.
That’s why we decided to make this article! Ready to get started?
Not so fast! 🛑
If Rollups are confusing, we must first understand ClickUp Relationships. Why? Because we need to have Relationships for Rollups to exist.
Let’s dive in!
To watch this explanation in video format, watch the video at the top of this article at timestamp 00:00.
What are ClickUp Relationship fields?
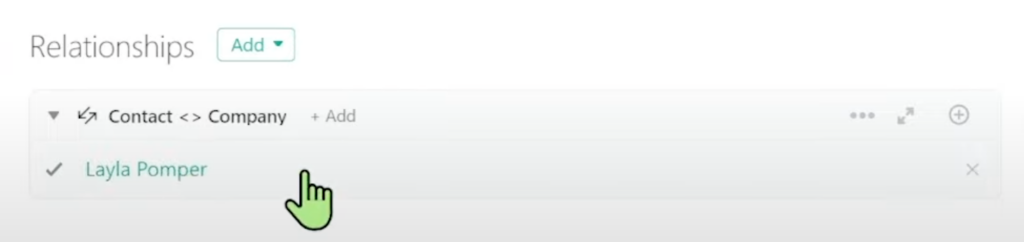
To start, we need to understand what ClickUp Relationships are. Here is a basic visualization of a ClickUp Relationship:
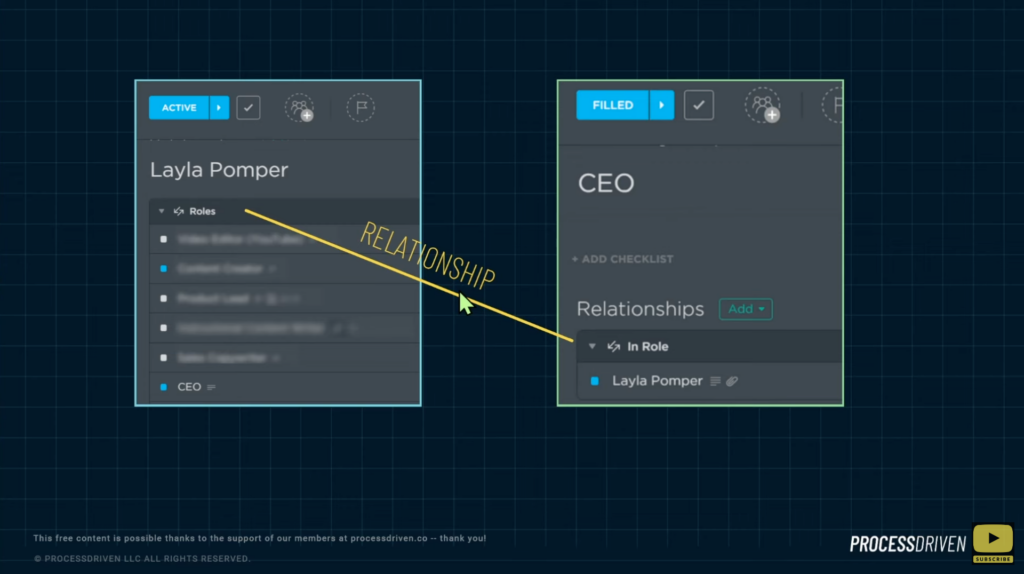
The image above visualizes how the “Layla Pomper” task is related to the separate task of “CEO.” It’s a Relationship between these two tasks in ClickUp.
That’s ClickUp Relationships in a nutshell.
Note: If you’re still confused about the concept of ClickUp Relationships, we recommend you read our article, ClickUp Relationships Tutorial, to understand the rest of this article fully.
To watch this explanation in video format, watch the video at the top of this article at timestamp 00:45.
What are ClickUp Rollup fields?
Once we’ve established a Relationship between two tasks, we can start to use Rollups.
Rollups basically say, “Hey, based on this Relationship, tell me something else about either end of the Relationship.”

In the last section, we made a Relationship between Layla and CEO. Since this Relationship exists, we can now say, “Hey, based on this Relationship, tell me the status of what that thing is I’m related to.”
Here’s a visual example of this in ClickUp:
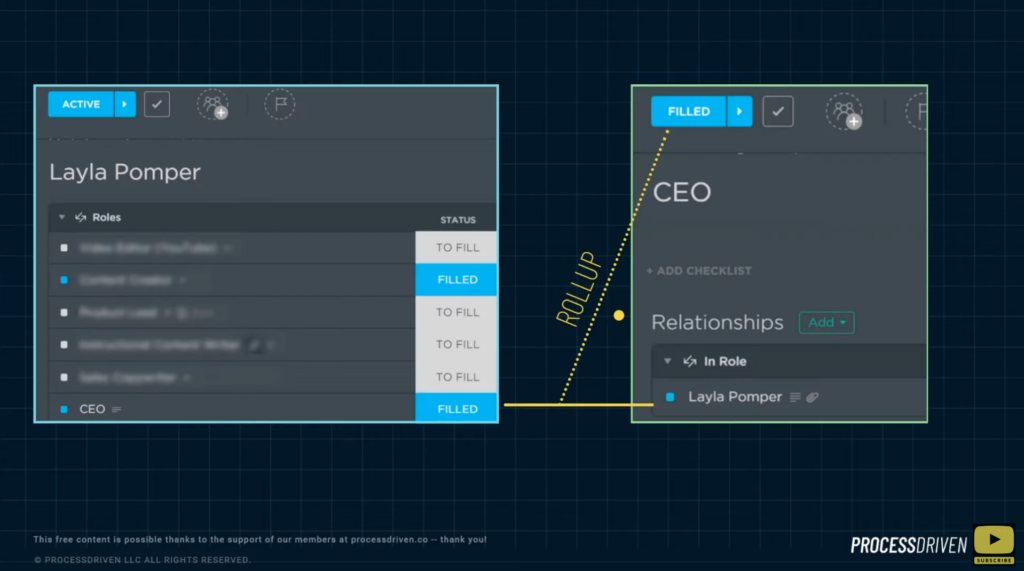
We have the task, Layla Pomper, and we can see it’s related to the role of CEO. Since this Relationship now exists, we can show details about the CEO task in a Rollup.
The column titled Status we see in the above image is a Rollup. How? Because it’s showing us stuff that’s in the CEO task, even though we are not in the CEO task at the moment.
Let’s go through an example where we build this out together.
To watch this explanation in video format, watch the video at the top of this article at timestamp 01:41.
How to create a ClickUp Relationship in a CRM
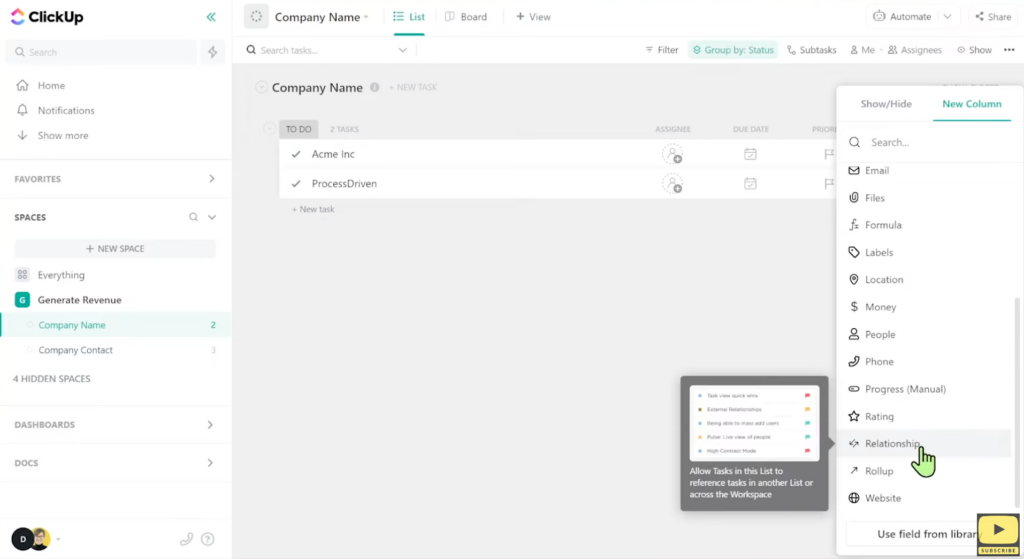
Let’s say we have two lists in ClickUp — one for Company Name and the other for Company Contact — we can relate these together using a Relationship.
We would start by creating a new column using the plus ( + ) button on the right-hand side and clicking on Relationship:
We’re going to name this Relationship: Contact <> Company.
Then, we’re going to relate the Company Name List to the Company Contact List:
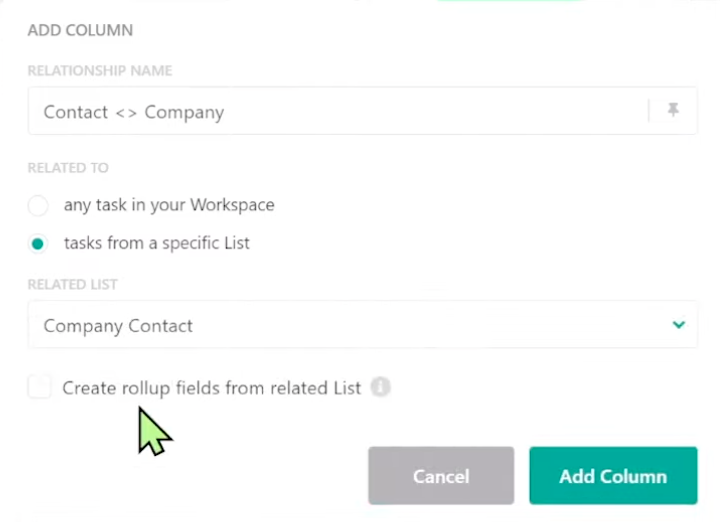
For now, we’ll leave the box for “Create rollup fields from related List” unchecked.
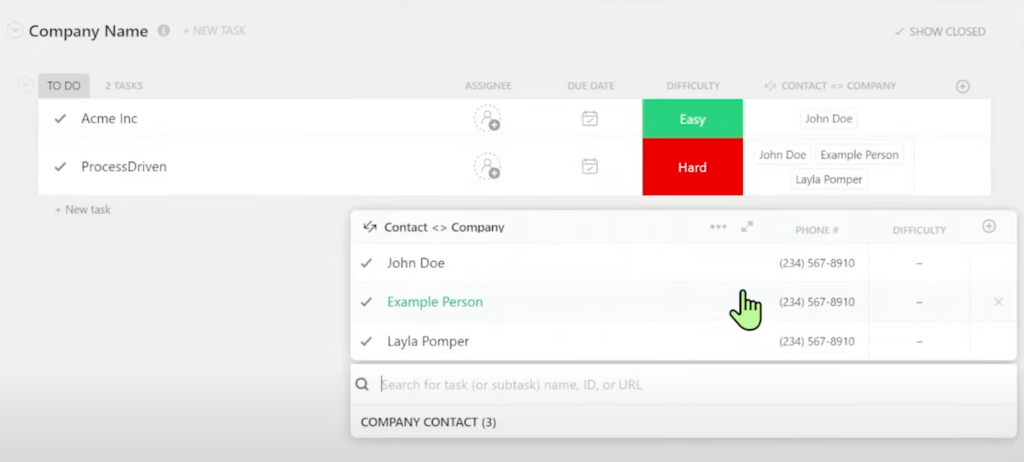
Once we add this field, we can connect the Company Name to our Company Contact. The result would look like this:

We’ll notice that Acme Inc (Company Name) is now related to John Doe (Contact Name) and that ProcessDriven (Company Name) is now related to Layla Pomper (Contact Name).
Pretty simple, right?
Now that we’ve established this Relationship, we’ve made it possible to have Rollups!
To watch this explanation in video format, watch the video at the top of this article at timestamp 02:52.
How to create a ClickUp Rollup inside a Task
If we go inside the ProcessDriven task and scroll down, we’ll see the Contact <> Company Relationship we built in the last section:
What if we wanted to see more information about Layla Pomper besides just her name?
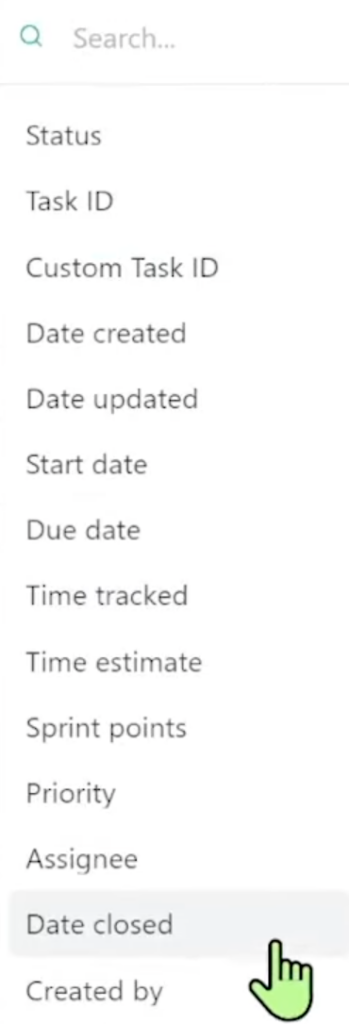
This could easily be done by adding a Rollup. Simply click on the plus ( + ) sign we see on the right side, browse through any of the fields found in the Contact List, and preview them as a Rollup:
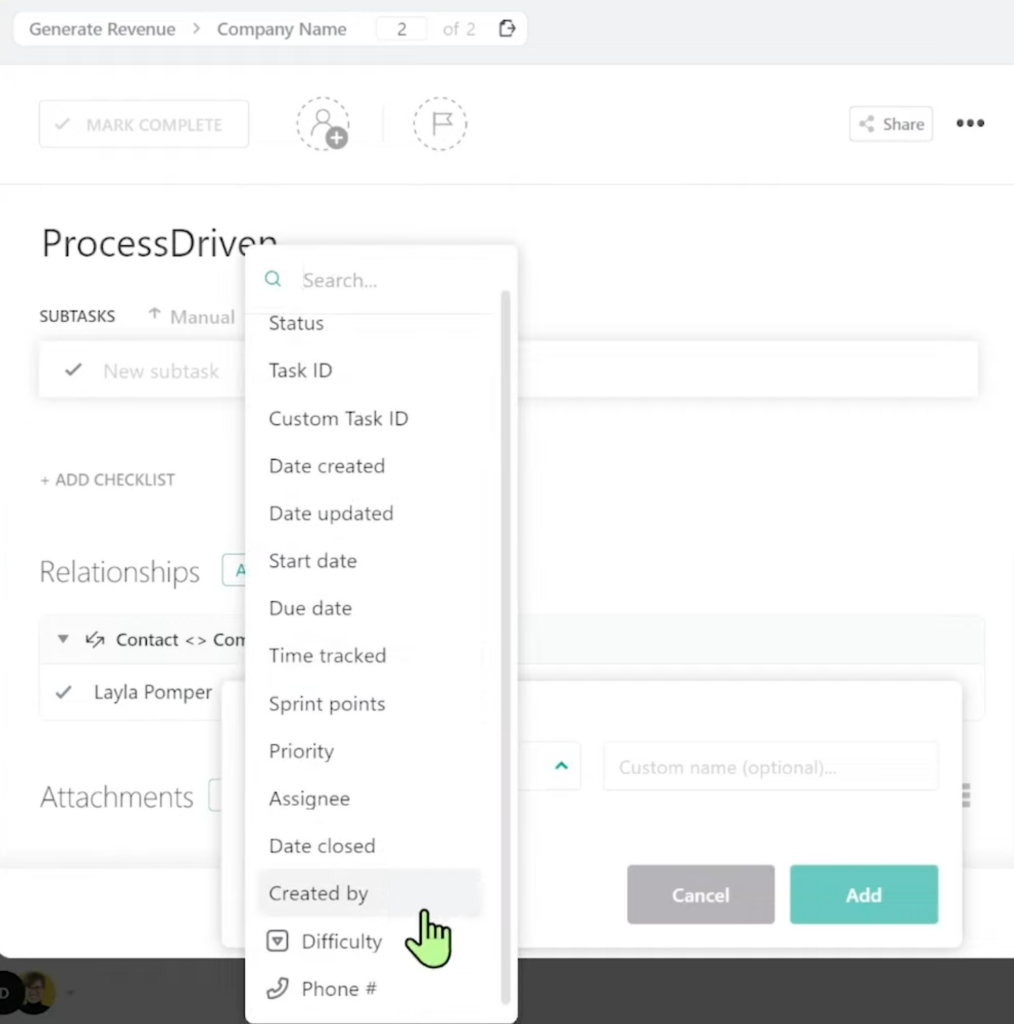
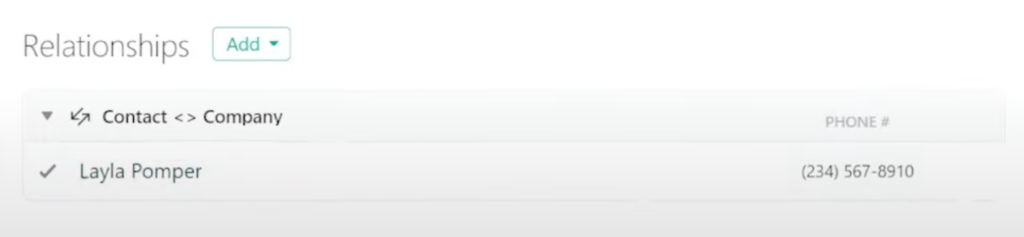
Let’s choose the field Phone # for this example. The Relationship area should now look like this:
We also have an alternative way to add a Rollup. In the List View, click on the Contact <> Company button found on the right-hand side:
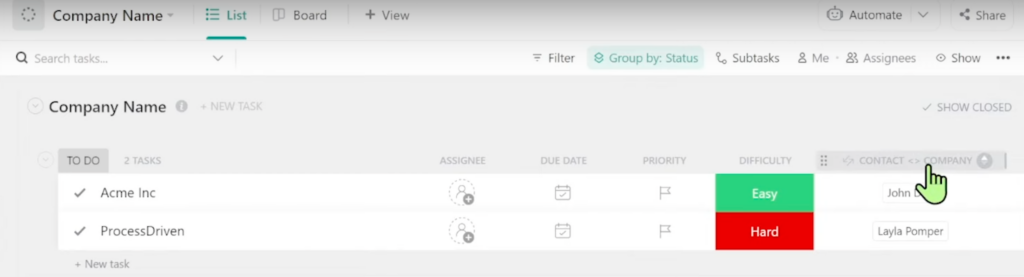
A drop-down menu will appear. Click on Edit Field.
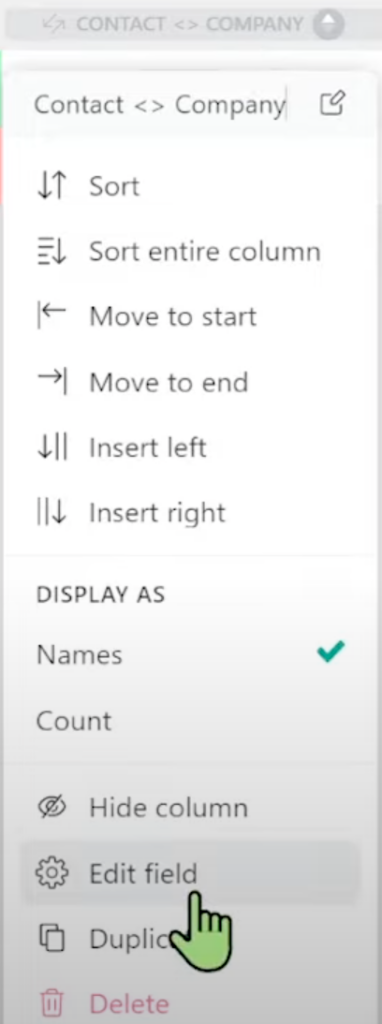
Voilà! Everything will be added in the exact same way as in the previous example. ClickUp just lets us create Rollups in two separate areas.
By itself, this kind of Relationship only lets us preview information based on the Relationship. However, Rollups can go one step further!
To watch this explanation in video format, watch the video at the top of this article at timestamp 03:35.
Ready to feel fully in control of your business so you can hire, scale, or sell your business with ease? Check out ProcessDriven Foundations™️.
Using Calculations with the Rollup Field to Summarize Relationships (Example #1)
Let’s imagine we have three different points of contact for the company, ProcessDriven. This will result in the Relationship having three different Tasks related to it.
Convenient, right? Not really.
Imagine how cluttered this area would be if we had 50 points of contact. Seeing 50 different phone numbers wouldn’t give us a good, big-picture overview.
That’s where the second superpower of Rollups comes in!
Rather than just having your Rollups appear in the location you’re trying to see them, you can also have Rollups do some basic math for you!
For example, create a new column in the List View and click on the Rollup field. Next, select your existing Relationship:

From this menu, we can select any Rollup field from the Contacts area and have it appear here.
So, why are we showing you this again?
Because depending on what Rollup field we choose, we now have a new Calculate option appear:
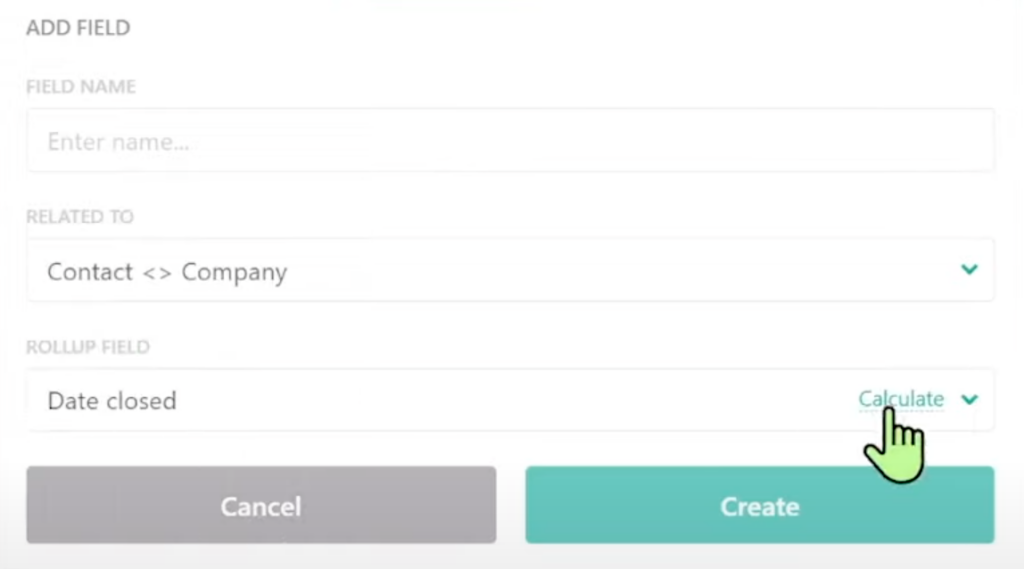
Let’s name this new field Contact Closed for clarity.
Before we hit the Create button, let’s determine what we want ClickUp to calculate. Based on all of the closing dates and all of the related tasks, ClickUp will calculate one of the following options:
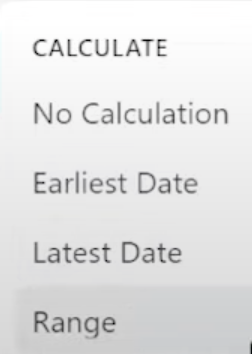
Pick one, and we’re done! The column will now have numerical data displayed in the List View.

While this is still called a Rollup, by it being its own column, it opens up the possibility of calculations and summaries.
We can always update what we want to have calculated by editing the column.
To watch this explanation in video format, watch the video at the top of this article at timestamp 04:41.
Using Calculations with Status Rollups (Example #2)
Another way we could use these calculations is by creating a new column called Contact Statuses. We then select the same Relationship (Contact <> Company). Lastly, choose Status as the Rollup field.
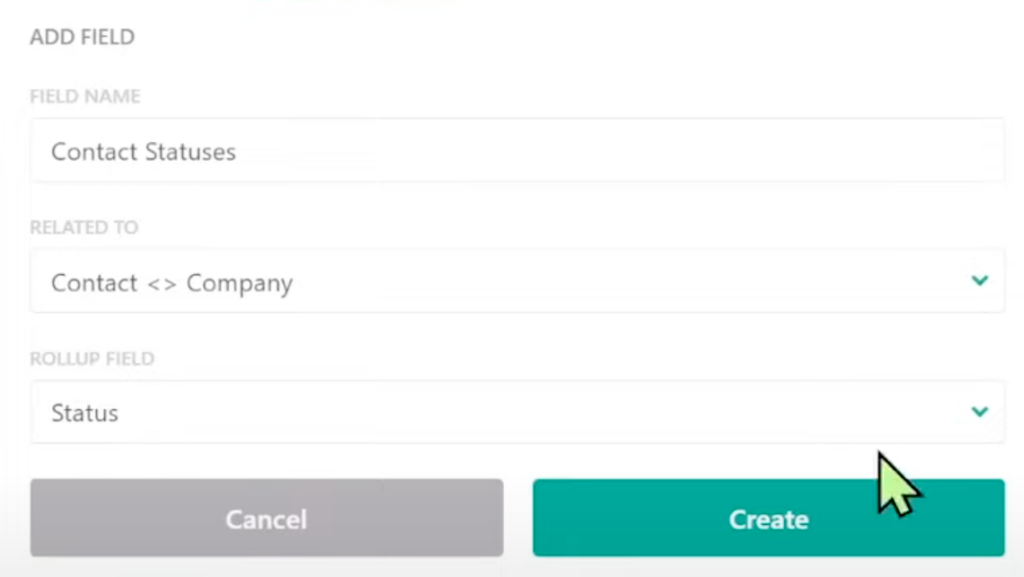
We’ll notice that there is no option to calculate anything because the calculation is always assumed with the Status Rollup field.
Once we hit Create, we’ll see something (we think is) pretty cool. Rather than just seeing the Status show up like this:
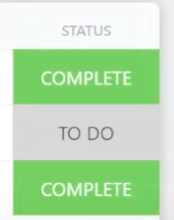
We’ll see it show up (sort of) like a progress bar:
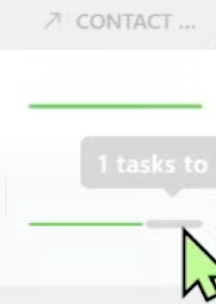
For Team ProcessDriven, this is visually easier to see versus having to click on the Relationship, scroll to the right, and then check the status. However, it’s a matter of preference!
To watch this explanation in video format, watch the video at the top of this article at timestamp 06:55.
Pro Tip #1: Relationships to “Everywhere” can Limit Rollups!
When editing Rollups, we’ll notice that we have many options around fields. It’s important to note that we only have this many options because we created a custom Relationship.
If we were to instead relate our Rollup to “any task in our Workspace,” we wouldn’t see as many Rollup field options.
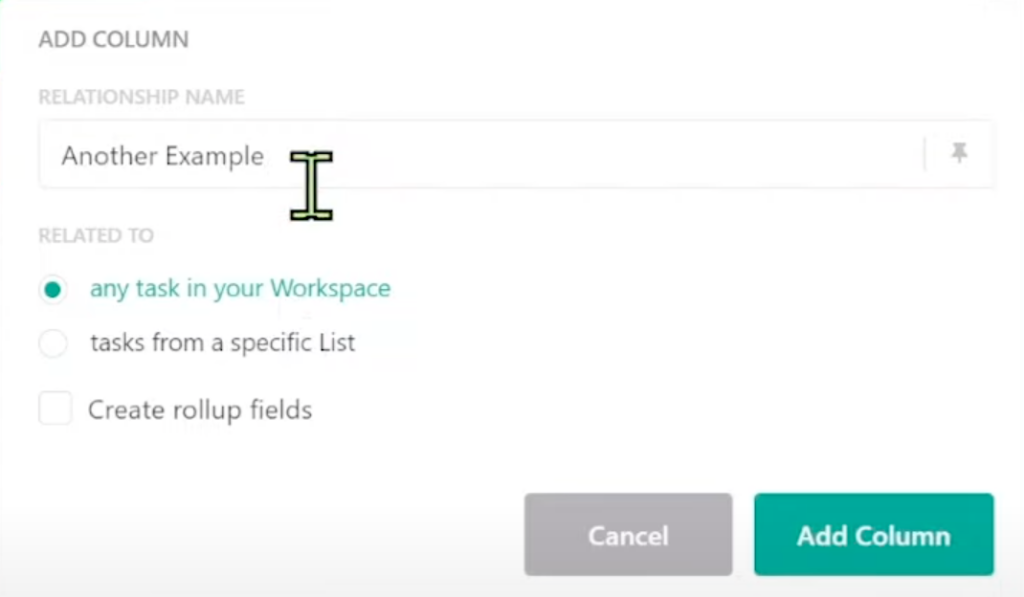
Notice how this menu has no custom fields available. You must always click “tasks from a specific List” to see the extra fields.
Keep this in mind when selecting the type of Relationship you want to establish!
To watch this explanation in video format, watch the video at the top of this article at timestamp 08:09.
4 Examples of how you can use Rollups
So why would we actually use Rollups?
The example we showed you above of relating a contact to a company is a pretty common scenario. Relationships are used quite heavily in CRM-style setups in ClickUp.
To be clear, ClickUp is still not a great CRM (since it lacks many features its competitors have), but the Relationships feature does help in these use cases.
Note: If you’d like to learn more about using ClickUp as a CRM with Relationships and Rollups, check out Build a ClickUp CRM | Relationships & Rollups Use Case Tutorial.
Another use case for Rollups, which we use inside the ProcessDriven Membership, is to create a SOPs List and a Humans List (it can be called something else).
The idea is to have a list of every person on your team and another list containing all your SOPs (or recipes — or instructions). We then use Relationships to connect people as tasks to specific SOPs as tasks.
We use this exact setup inside ProcessDriven.
The third example use case is using ClickUp to document automations. Similar to the SOP <> Human use case in the previous example, we’re going to create a List of automations in our business and another for tools or software we use.
We’ll then relate them together using Relationships and Rollups. We always want to use Rollups because it helps us summarize that specific Relationship.
To visually see this example use case around documenting automations, check out Organize ClickUp with an Automation Database.
The last example use case is another one we implement here at ProcessDriven, and that’s to use Relationships and Rollups to keep track of our content creation and repurposing process.
We heavily rely on Rollup fields to be able to view due dates of one thing in a secondary location using Dependency Relationships.
To summarize, the four example use cases were for:
- CRM
- SOPs
- Automation Database
- Content Creation/Repurposing
There are certainly more use cases for Relationships and Rollups, but these four examples are great ways to start incorporating these features into your daily flow.
To watch this explanation in video format, watch the video at the top of this article at timestamp 09:32.
Pro Tip #2: “Rollups of a rollup” isn’t possible (yet!)
It’s important to remember that we cannot have Rollups of a Rollup at this moment. So if you have multiple Relationships chained together, there isn’t a way to send that Rollup through the whole chain. 😬
To watch this explanation in video format, watch the video at the top of this article at timestamp 12:05.
Check out ProcessDriven Membership!
If you’re interested in how we use Rollups in the (somewhat) sophisticated structure we recommend our clients implement, check out the ProcessDriven Membership.
This Rollup structure is a key cornerstone to how we recommend folks set up their ClickUp foundation and their ClickUp Hierarchy.
Just sayin’. 😉
Until next time, enjoy the process!
Ready to feel fully in control of your business so you can hire, scale, or sell your business with ease? Check out ProcessDriven Foundations™️.

ProcessDriven helps small teams turn chaos into process. The ProcessDriven Approach™️ combines software expertise with practical process-first strategies that have helped 1,800+ teams build a scalable foundation of business systems.