Wondering how to use ClickUp for new hire onboarding? We’ll break down our approach to onboarding new hires in ClickUp with 5 EASY steps.
ClickUp Course creator Layla at ProcessDriven walks through how we’ve recently worked through our own new hire onboarding process, and how our team has helped new hires become familiar with (and confident in!) our ClickUp Workspace in their first 30 days.
⭐ Check out our How to ClickUp Mini-course and learn the basics of ClickUp in ONE day here: https://processdriven.co/services/mini/


Hiring is an exciting opportunity for any company!
With someone new on board, you’ll need to get them set up with your Workspace, but you want to make sure their onboarding process isn’t completely overwhelming.
In this post, we’re going to go through five steps to get your employee from “Yes, I’m excited to work with you!” to “Yes, I know what I need to do!”
This 5 step process is how we have been bringing new employees into our own Workspace – something we’ve been fortunate to be doing a lot of lately!
A quick summary of what we’ll be going over:
- Review SOPs
- Create an “Onboarding Zone” for your new Team Member
- Invite your new hire into your ClickUp Account
- Schedule regular new hire and supervisor check-ins
- Integrate your new hire into your team
Review SOPs – Step #1

Before you bring someone into your ClickUp Workspace, you’ll want to take the time to review your business’s SOPs.
This will give you a tactical overview of what you want your new employee or contractor to be working on. You’ll know exactly which processes, routines, and tasks a person is directly responsible for doing.
If you don’t have any SOPs or are not sure who should create them in your current team, check out our blog here: Who should create business systems and SOPs?
Starting here will help you understand how to write the job description, how to direct the interview, and how to structure what they will be actively working on.
During this time, you’ll also be able to figure out which SOPs and what technology you’ll need to give this person.
Spend the time to go through your SOPs to make sure they’re accurate, that they make sense for the role, that there’s nothing missing, and anything outdated is taken out.
Need help figuring out where to house all these technology wikis and SOPs? Head to 4 Easy Reference Charts to Create (to Start Systemizing Your Business)
Layla explains this step in detail starting at 0:52
Create an “Onboarding Zone” for your new Team Member – Step #2
Now that you have the job mapped out, you need a way to communicate it to the new team member.
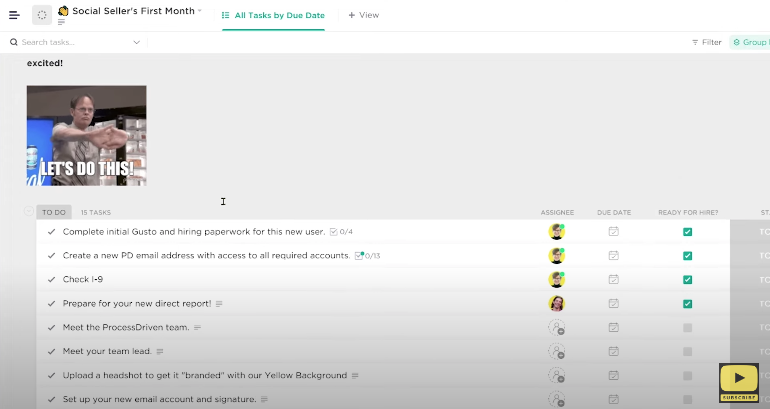
We recommend setting up a “First Month” list for your new onboarding member to get an overview of what they’ll need over the next month.
Ideally, you’ll at least have the first week completely mapped out from start to finish so they know what’s on their plate and you both have clear expectations of what’s ahead.
Keep in mind, your new teammate might not have any experience with ClickUp so you’ll need to make sure they know what to do inside this new software.
Inside of ClickUp, they have a few beginner templates for those that are completely new to the software. This might be the best place to build out your template to help them get up to speed with how it works.
The main things they’ll need to understand are:
Between the first two weeks and the end of the first month, you’ll also want to touch on conventions, aka “Rules of the Road” when it comes to your account. Some things you might want to touch on include:
- Who is allowed to change assignee
- Where to find top priorities
- What happens when things are overdue
- Any other steps in your overall workflow
Layla covers creating an “Onboarding zone” starting at 3:15
Invite your new hire into your ClickUp Account – Step #3
Now it’s time to bring them in and welcome them into your account. We recommend inviting them into their own, single list just to start.
This is especially important during their first week.
This can prevent them from being overwhelmed. It can also keep them from accidentally messing up something in another workflow while they’re still learning their way around the software.
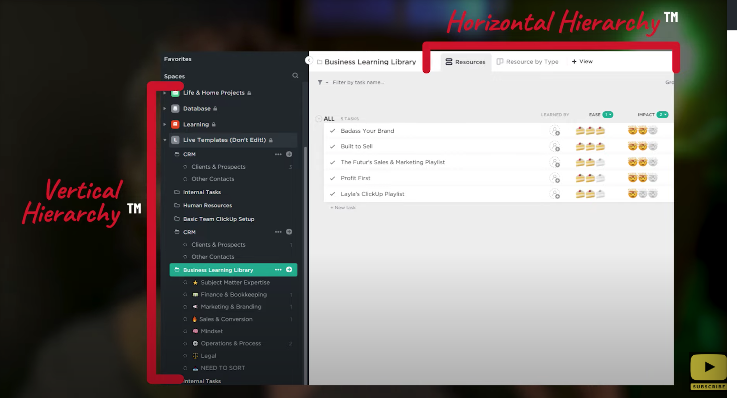
As you start to work together, you can invite them into more of the spaces, lists, and documents as needed. Until then, you want them to start learning the horizontal hierarchy versus the vertical hierarchy.
Once they have their area mastered, that’s when you can start giving them more and more access.
Alternatively, you can create a Dashboard with their supervisor to create a 1-on-1 area for them to go discuss tasks or ask questions. This is a way to cut back on email if your company wants to keep everything in one place.
We have more information on dashboards and setting them up here: How to Add Widgets to ClickUp Dashboards to Keep Your Team on Track (ClickUp Dashboard Example)
Layla explains inviting them into your ClickUp account at 7:00
Schedule regular new hire and supervisor check-ins – Step #4
At this point, you’ll want to work directly with your new hire to get them completely set up. We recommend setting up a few meetings during the first week to just touch base and help them with anything going on.
You’re probably more knowledgeable in ClickUp than they are. It’s tempting to share your screen and show them how you recommend doing things. Instead of sharing your screen, you’ll want them to share their screen as they work through tasks.
You’ll want to see how they’re working through their tasks. As they do, give tips where you think they could improve or make something easier.
After the first week, you might be able to reduce your meetings to once a week or even every other week. But just make sure you’re at least touching base through the Dashboard or in comments for specific tasks to keep communication open.
Learn how to use comments effectively with our guide: Should I @ tag in ClickUp? | How ClickUp Watchers impact notifications, Chat, & Task Comments
Layla goes over check-ins starting at 9:33
Integrate your new hire into your team – Step #5
After the first month, you’ll really want them to move off of their own list. This is when to integrate them into the overall workspace.
By this point, they should understand the basics of ClickUp and how your workflows flow together.
Give them a few days to move their tasks out of their “First Month” list and find new homes for them.
If they cannot find a particular place for a certain task, that might be a time to discuss a new SOP, workflow, or space for that topic/task to fit inside.
Layla goes over integrating your new hire at 12:35
Related Resources
➤Who should create business systems and SOPs?
➤Your FIRST HOUR in ClickUp | Create a ClickUp Account, Space Settings & Notifications