Do you find that managing emails could be a full-time job? Maybe it is! Are you ready to delegate your inbox?
In this video, we are going to be talking about the five tangible steps you need to do as a business owner or team leader to take your inbox from a “you” place to a “we” place and (ultimately) delegate your inbox to your team.

Let’s Dive In
Are you a busy business owner or team leader who feels like your inbox in and of itself could be a full-time job? Or maybe you’re spending a lot of time forwarding emails to other team members and hoping they answer them (but then sometimes reply to the same email they just responded to)?
If you have any of these symptoms, we have something in common. When we were struggling with our inbox management, the information online (at the time) was useless. Nothing answered how to actually delegate your inbox without giving your VA access to your email. It felt way too casual for what we needed.
As a result, we’re sharing what we learned the hard way over the past 12 months of figuring out how to delegate the inbox effectively.
Step 1: Alias Email (Optional)
The first step in the process to delegate your inbox is optional, but we highly recommend it. This step is especially helpful if you’re just starting out because it will save you so much time.
So, the first step is setting up email aliases. An email alias, according to Zoho, is a nickname. We think that’s a nice way to think about it. Aliases allow you to have one email address that you pay for one time but it receives mail for tons of other email addresses at the same domain. For example, you could have the email address john@processdriven.co. You could also have johnny@processdriven.co or hello@processdriven.co. As long as you have [your email]@[your domain], you can set up email aliases like this.
Whether you’re using G Suite or Outlook (or something else), there is a way. We suggest you look up the email alias and the name of your email provider to make sure you get the correct instructions. If you use G Suite for your business and have your domain connected to email through Google, go to admin.google.com, then to your directory of users, and click on any user. Once you’re inside the users, you’ll have the ability to add new alternate emails such as hiya@processdriven.co or any other domains you have connected. Just click save and you’re good to go!
Now that we know what an alias is, let’s make sure you have the two aliases. You’ll need these to implement the structure for a smooth path to delegate your inbox. The first alias is an alias for the public. You’ll need an email address that doesn’t include your name in it and can be used any time a stranger wants to contact your business. All of these will end with @[your domain], so @processdriven.co for us, and you can start with something like hello, info, hi, sales, inquiries, etc. Pick one and you now have your public-facing alias.
Once you have that alias set up, set up a second one. If the previous one was for the public, set up a separate one for your clients. This could be something like clients@processdriven.co, cx@processdriven.co, customers@processdriven.co, support@processdriven.co, etc. Any variation lets people know that this email address is for people who are working with us currently. You will need to create both of these aliases in whatever system you are using and click Save.
The sooner you set these up, the better. If you start giving your clients your personal email, delegation is a lot harder than if you just tell them, “Hey, email clients@processdriven.co. You’ll reach my team or me.”
Getting that email address is a great first step, even if at first it’s just an alias for yourself and it only goes to you. If you don’t want to do this step or if it’s stumping you, that’s fine! It’s completely optional. However, if you can set up those aliases, please do so first!
Step 2: Share Access So YOu Can Delegate Your inbox
Now that we have our aliases set up, step number two in the process to delegate your inbox is making sure your team can actually see emails when people email those email addresses. To do this, there are two methods. One involves using the tools you already have, and the other involves buying a new software. So there are options for both budgets.
The free path is to use the tool you’re already using, most likely Microsoft or Google, and set up a group. In Google, they’re called Groups. In Microsoft, you can refer to them as distribution lists or groups. This group allows us to send one email to multiple people. That way, everyone who’s on the customer support team will be alerted when that email is received.
To do this in Google and Microsoft, you will first need to create a group. In our example, we’re going to go with Team ProcessDriven as the reply name because we want to show cohesiveness. We’re going to change the group email to customers@processdriven.co. Then, we’ll describe what this group is for in the description area (used for internal purposes).
Next, we’re going to choose how this group is used. Who can send things to the group? Who can receive things from the group? Receiving is the first bit. We’re going to choose certain people on the team to join this distribution group. Next, we will allow only people in this group to see the conversations in this forum. Posting is something we want everyone to be able to do. We want the public to be able to contact this imaginary email for customers. Now, who can view the members of this organization? Let’s say, everybody (or other people on this team). We’ll be able to see who gets the customers’ emails, so we’ll leave it as such.
Next, we get to choose who is in this group and who gets to actually receive these emails. In this example, we’re going to choose TJ. Then, I can send him a message. Finally, I get to decide how often TJ receives emails. If this email address receives an email, should TJ get an email right away, only once a day, or…whatever frequency you’d like. In this case, if we’re using this as a group email system, we want it to be for every email. Therefore, any time a customer emails this email address, both TJ and the admin will receive the email. Now, we’re going to click Create a Group.
If you go to the group, inside your group settings, there is one more adjustment we need to make to get this ready to go and ready for everyone, and that is to enable a collaborative inbox. Now, when emails arrive in this inbox, you’ll have the option to assign that email to yourself or to others. You can mark it complete or as a duplicate.
You have some options around managing emails that other people (who are part of this collective group) will be able to share. This is a lovely way to get into that collaborative inbox environment. We started with this method when the team started helping us with the inbox. More and more of our emails would go into the collective area, and people would assign emails to themselves. Layla would end up taking whatever’s left.
The downside of this is that it’s still in the inbox. This means if you were to assign an email to someone else and they don’t know how to handle it, they’re going to have questions, and they’ll need to ask you. That would result in more emails and could potentially unwind the whole delegation process by making it really hard to collaborate. So we want to present you with the second option to achieve this second step, a tool called Missive.
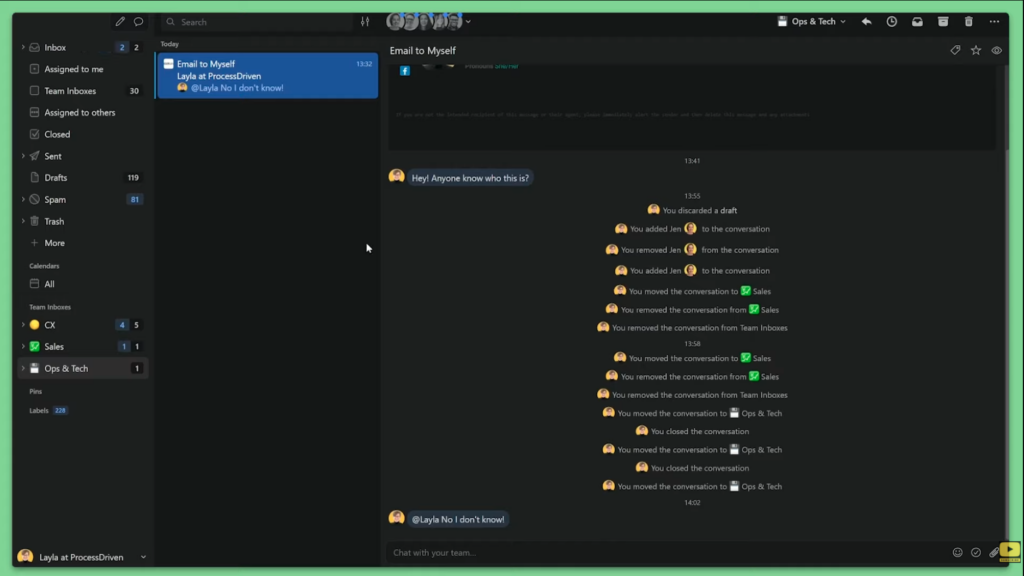
To be clear, this is not sponsored by Missive. We’re just huge fans and that’s why we recommend you use it to delegate your inbox. Missive allows you to chat right alongside emails and delegate and assign things back and forth to people in one, purpose-built tool. It has a pretty layout, it’s very organized, and there are a lot of shared automations and other features. These features are huge timesavers versus free options like Google Groups. We actually have a whole video on Missive right here if you want to check it out. It’s an excellent option for this second step of making sure that everybody can access that email address.
Once you have that alias set up and access to your teams provided, you’ve technically finished the process to delegate your inbox because, technically, emails are going to the right people! Other people can see what they’ve got going on but, as you probably know, having access to something and knowing how to handle something are two different things.
Step 3: Clarify Ownership to delegate your inbox
The next step in this process to delegate your inbox is addressing the people who are part of the equation. This brings us to this flow chart that breaks down how we currently handle our inbox:
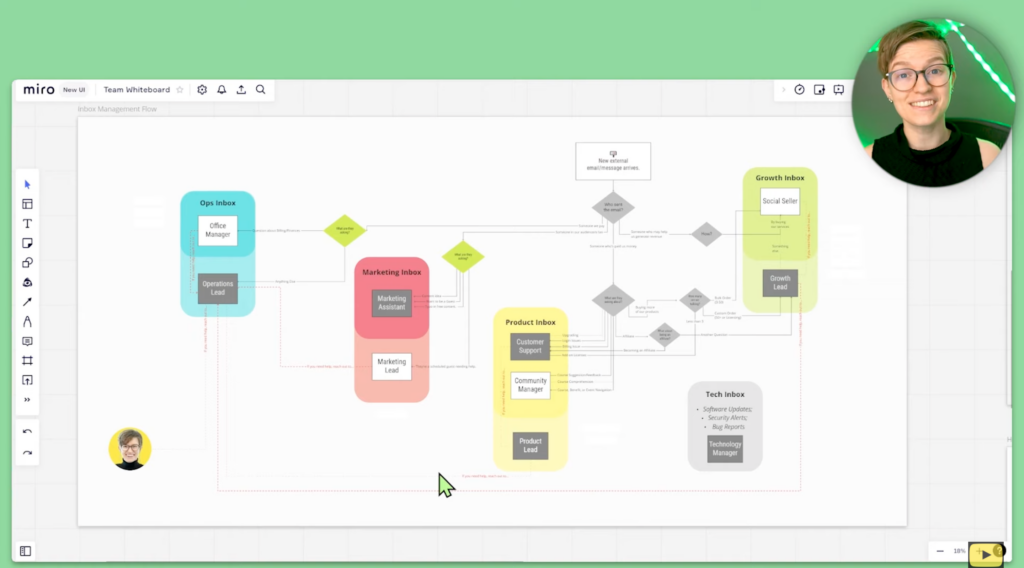
This flow chart breaks down how we currently delegate our inbox. The first question you should ask yourself is who sent the email? This helps you figure out who’s in charge. If you’re following this tutorial, you’ve done the same. You have clients and non-clients, and those are your two branches from here.
To follow along with Layla in this example, start watching at 08:58
To summarize, we have these paths of common scenarios to help us figure out who is in charge of what email.
For us, this process started with all emails (internal and external) going to Layla. Then, it evolved into “If it’s internal, it goes to the Community Coordinator and if it’s external, it goes to Layla. It just kept expanding until it got to the point where it’s at right now. It will still grow significantly as we have more scenarios.
When you first get started, almost all of the lines will lead to you (the business owner) having to answer them. Over time, that won’t be the case anymore. Having this flow chart as a working draft that you can keep updating as you continually delegate is excellent. Just keep in mind every time you receive a new type of email, add it to this chart and start mapping it out.
“Okay, someone who may help us generate revenue. How? They want to sponsor us. Alright, maybe sponsorships always go this way.”
Make sure you add those branches into the chart as you think about how you want to handle those emails. Who is the point of contact? That’s what this chart is all about. It’s just letting us know who is the person in charge or responsible for that type of issue.
We actually talk a lot about process and accountability for processes inside our ProcessDriven Membership. If you’re a member (or if you want to become a member), this is the kind of information you’ll probably already have in your Process Org Chart™ for your business.
For now, we’ll just put it in terms of emails. Ask yourself, who is responsible for what?
Step 4: Reply to Email
Once we have everything set up, our fourth step is to make sure we know how to respond to an email. Let’s say you receive an email for customer support about a billing issue and your VA, Sally is the person in charge of the customer support inbox. The customer support person, in this case, your VA, needs to know how to handle and respond to billing issues.
Besides just jumping in and telling them what to do or doing things yourself, there are three ways to make sure people know how to respond to a given email.
SUBStep 1: Trust
This is the hardest step. It’s also the most common, especially when you’re just getting started.
Being your VA, Sally knows how you do things. When she gets that email, you just hope and trust that she knows what she’s talking about in her response. She’s going to respond to the best of her ability, and you trust that she knows her stuff.
For some teams, trusting people is the only system they need when it comes to email because they deal with a highly-skilled, small, tight-knit team. For the rest of us, there are two other tools we can use to supplement trust because no matter what, we need that trust.
SUBStep 2: Templates
The first tool is the one you’re probably thinking of: templates. For example, if we have a billing issue that we send to our VA, we might want to have a pre-written email on how to handle that particular type of billing issue. We could do this for every kind of issue that comes up. We could also have our VA do it, have us approve it, and then have them continue to use that template they drafted. Regardless of who creates it, templates are a great timesaver. It’s also a great way to standardize and let you feel that you trust the response that’s going out because you know what the answer is going to be.
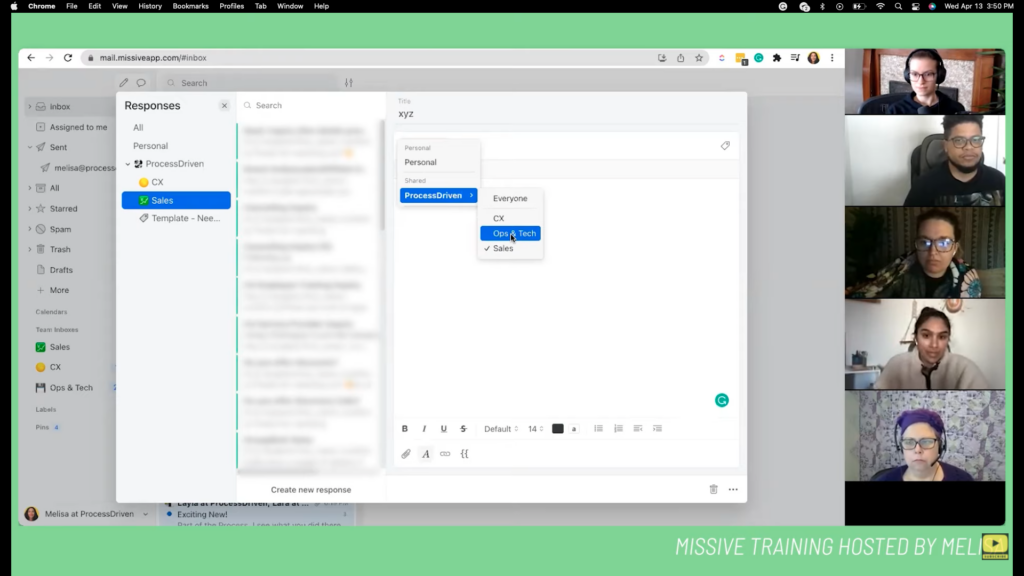
Suppose you set up your collaborative inbox in a free tool. In that case, most often, the easiest way to create these email templates is by creating a Google Doc. You can throw all of your email templates in, and people copy and paste them into emails when they’re ready to use them. However, if you went the specialty tool route and started using Missive or whatever else, you’ll probably find some sort of template center.
Missive, for example, has a templates area where you can have fill in the blank spots that pop up in a form. This prompts you to fill in your template with accurate information, and it automatically populates an email based on that. So whether you store your templates in a specialty email tool, Google Doc, or Word File, it doesn’t really matter as long as you have the content written.
However, no matter how much you trust people or how great your templates are, there will always be emails that fall between the cracks and require a good amount of ingenuity and creativity to answer.
On the flip side, you also don’t want your team to be stuck creating emails from scratch. This brings us to the second tool we have for actually responding to emails.
SUBStep 3: Devising a Framework to delegate your inbox
A framework is a lot like a template, except rather than telling you what to say, it tells you the main chunks to include. Let’s say we were going to write a letter, our framework might be something like this:
- A greeting
- What I’m about to tell you
- The body
- Concluding thoughts
- Salutations
These are the five main pieces of a letter. We’re going to do something very similar, but slightly more detailed for any type of email that we can’t fully template.
E.C.H.O™ is a framework we created here at ProcessDriven for that exact purpose. It’s a four-piece framework that lets the team know what we expect to see in every email — the four essential pieces. For us, those four pieces are:
- Empathy
- Challenge
- Honesty
- Opening
We’re a small team, but we take the time to teach E.C.H.O™ to every new employee during onboarding.
We’ve even had a Lunch & Learn on it recently. We continue to find new ways to refine what our collective team voice is and how to make sure we’re all continually raising the bar for how we handle emails. That one-on-one communication matters so much. Is it perfect? No, but it definitely helps. It gives a guiding principle to let people know what we expect when it comes to an email. If an email lacks something, you can always say, “Hey, Sally, this email isn’t quite right because it’s missing the C in E.C.H.O,” and she’ll immediately know. You need to have that common language, and then you can revise drafts moving forward based on that.
To wrap up step four in the process to delegate your inbox, the first way to make sure people know how to respond is to trust people. The second way is to have awesome templates, and the third way is to create a framework or some guiding principles to help everyone be clear on the expectations for every email.
Step 5: Communicate
Last but not least, the fifth step of setting up email delegation is one we alluded to before, and that’s making sure you have one clear spot for communicating when it comes to confusing emails. No matter how great your frameworks or templates are, there will be curveballs in the inbox. It’s important for your team to know how, where, and when to ask you questions if they need help.
Delegating your inbox can be bumpy at first and you want to make sure that you are open and available for communication to help set your team up for success. If you’re using a free collaborative inbox tool, like Slack or Voxer, you should have one dedicated thread or channel just to talk about emails whenever an issue comes up.
If you’ve decided to go with the specialty software route, like Missive, every email allows you to comment back and forth so you can collaborate with your team in real-time.
Check out our How to Use Missive video here. (You can also use our affiliate link above to get started for free!)
Either way, whatever your method is, make sure you have a way. Make sure that you are clear with yourself and your team that at least at first, it’s not going to feel that easy. When you first start delegating your inbox, you will be dedicating a lot of time to helping your team get up to speed. That’s 100% okay! The second or third time that same issue comes up, they’ll know how to handle it independently because you’ve guided them along the way.
Those are the five steps you need to delegate your inbox. You need the proper tools, to start creating workflows, and you need to let people learn and be patient through that learning curve
Until next time, enjoy the process!

ProcessDriven helps small teams turn chaos into process. The ProcessDriven Approach™ combines software expertise with practical process-first strategies that have helped 2,020+ teams build a scalable foundation of business systems.