In this Integromat tutorial, we’re going to show you how to automate client emails using Integromat and your favorite email marketing tool.
In Part #3 of this Integromat Tutorial series, we’re taking the client onboarding automation we built in Part 2 and adding just a few more steps to fill in the blanks between “Invoice sent!” and “Here are your deliverables!”.


Filling in the blanks between “Invoice sent” and “Here is your deliverable”
If you saw Part 1 or Part 2 of our Integromat integration series, this is Integromat tutorial is a continued follow-up to show you how to include some automated emails in your client onboarding sequence.
Specifically, we’re gonna add a few emails into your client onboarding flow. This specific post will be more about communicating expectations between the invoice being sent and when the project starts and ends.
Gathering our tools
We’ll be using two separate tools to get this done: Integromat and MailerLite.
If you don’t know by now, Integromat is an automation tool that allows you to connect different pieces of cloud software together to make something happen.
While we use MailerLite as our preferred email marketing tool, you can use any other email software tool and have the same automated impact on your client onboarding sequence.
⭐ Want a free month of Integromat’s Standard Plan? Use our special affiliate link.
Building out the workflow using Miro
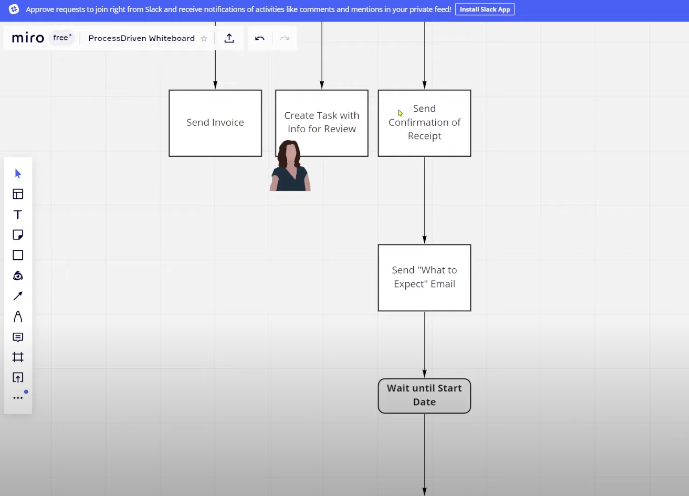
What we’re going to be doing is expanding the original workflow we built out in Part 2. (If you haven’t watched it yet, now’s your chance to get caught up!)
As you can see in the above image, we begin by mapping everything out inside of Miro. This gives us an idea of how we want our new client onboarding workflow to, well.. flow.
Aside from getting a proposal, signing a contract, and get sending an invoice, we’re adding on some additional steps.
From there, you can map out what else you would need to send clients. We recommend a “what to expect” and a “reminder” email, just to keep everyone on the same page.
Building out the Integromat Scenario
While it looks like a simple workflow, let’s break down how you can make sure it flows smoothly inside of Integromat.
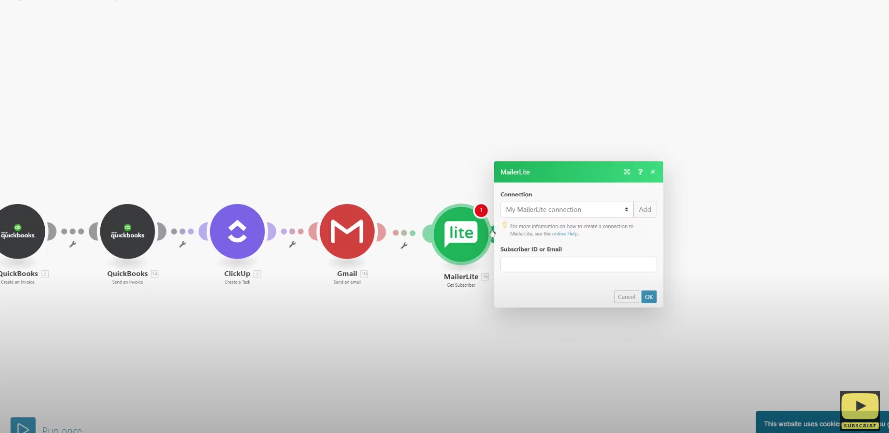
First, you’ll want to make sure to select MailerLite (or whichever is your preferred email marketing tool) as the connection inside of Integromat. Choose “Get Subscriber” because our goal here is to locate the existing subscriber – which is the email that was initially submitted via the Cognito Form in step one – inside your email list.
Once you locate the email field, you can run just that one module to test it and make sure it’s working. If it comes back with a ton of stats about the email, that means it worked!
Layla walks through this step starting at 3:13 if you need some clarification.
Adding an “Ignore Error Handler” in an Integromat Scenario
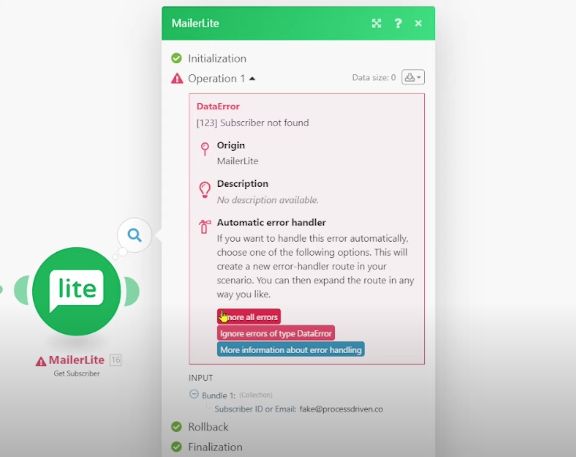
To take our confidence in this automation to the next level, we like to run a fake email address that we know is *not* on our email list, just to see what happens inside the automation. When we test it here, Integromat will signal an “error”, because as it was searching your email subscriber list, and that email was nowhere to be found – it was missing the step that tells the software what to do when this error occurs.
The next step here is to give Integromat instructions on what to do when an email is submitted that isn’t currently on your email subscriber list. By creating scenarios that are simply preventative, we can rest assured that no matter what the situation, we’ve set up Integromat with the instructions on how to handle it. (Which means less worry about any broken automations!)
Layla explains how to add an “Error Handler” in Integromat when these situations come up in our workflow starting at 05:21 and how to add a “Resume Error Handler” starting at 14:46.
Adding a “Router” into your Integromat workflow
Adding Routers into your Integromat workflow creates a “fork in the road” where you can send your submissions down one path or multiple paths.
In this example, we’re creating two paths. One where the incoming email address does exist in our email subscriber list and we are then telling MailerLite to simply update their existing profile. And the other, where the email address does not exist in our email subscriber list and we are then telling MailerLite to first create the profile, then update it according to the information provided in the original Cognito Form.
A walk-through on how to add a “Router” here is presented starting at 06:28.
Updating the custom fields inside your email marketing tool – automatically
To map out our first path where the newly submitted email address does exist on our subscriber list, we want to make sure that we’ve created the custom fields in our email marketing tool that we want Integromat to automatically update. This includes tags, start date, end date, or any other details you find important in that new profile.
How to automatically add a new subscriber to your email marketing tool
For the second path, you’ll still need all of the custom fields in your email marketing tool. (Because remember the only extra step added in this path is creating the new subscriber profile). For MailerLite, there isn’t a specific option to just “Add a Subscriber”. We’re not sure why, but there is a workaround!
By picking “Add Subscriber to Group”, that allows us to add a new subscriber while also requiring us to add them to a group. This works out nicely because we can simply add that new group custom field into our email marketing tool. (And grouping our subscribers is just another way to add data that can be useful later.)
Then, we simply follow the same setup we created in the first path. This will add all of the necessary information to the new subscriber (rather than an existing one). We’ve now told Integromat how to communicate with our email marketing tool in either scenario – whether the email address submitted originally existed already, or didn’t.
Layla breaks this down starting at 07:45.
Triggering an automation directly inside your email marketing tool
So we’ve told Integromat what we want to share with MailerLite, whether the new email address submitted exists or doesn’t exist, inside our subscriber list.
Now, we need to tell MailerLite directly what to do when it receives this information.
For our example, we set our automation up so whenever a start date is provided, then we start the workflow. (Meaning whenever a profile is updated or created with a new start date, the first “welcome” email is automatically sent). You can send a variety of emails based on what you need in your workflow. You can even take it all the way through the end date of the project. Try automating emails to say “hey, your project is ending soon, here’s how you can stay a valued customer!.”
Why Automations can completely change your workflow for the better
If you’ve made it this far, way to go you! Setting up an Integromat scenario for the first time can be intimidating! While we try and break it down as much as possible, there really is no better way to learn how this (super cool!) software works – other than by getting your hands dirty.
Check out Part 1 and Part 2 of this Integromat Tutorial Series to find more ways that Integromat can help you automate your workflows in a way that saves you time and money.
⭐ Want a free month of Integromat’s Standard Plan? Use our special affiliate link.