Looking to automate your client onboarding process? In this post, ClickUp course creator Layla at ProcessDriven will demo how to give an Integromat example to automate client onboarding, proposals, contracts, and invoicing.
By combining Cognito Forms, Quickbooks, ClickUp, and Gmail Modules inside Integromat scenarios, we’re able to build an automated customer onboarding process and experience.
(If you’re looking to leave Dubsado and want to replicate its 3-in-1 functionality elsewhere – this post is for you!)
? Want to try 1-month of Integromat’s Standard plan for FREE? Use our affiliate link!


Recently, we mentioned that we’re switching from Dubsado to Integromat when it comes to automating the processes that we worked so hard to build.
We decided that instead of sticking with one thing that did a lot of things poorly (Dubsado), we’re switching to using the tools that already work and gluing them together with the magic of Integromat.
In this post, we’ll be going over how you could quickly and easily automate your client onboarding using Integromat.
Before you dive in, get caught up with part one of our switch from Dubsado to Integromat here: Integromat Tutorial – How to leave Dubsado for good!
Mapping out your client onboarding workflow using Miro
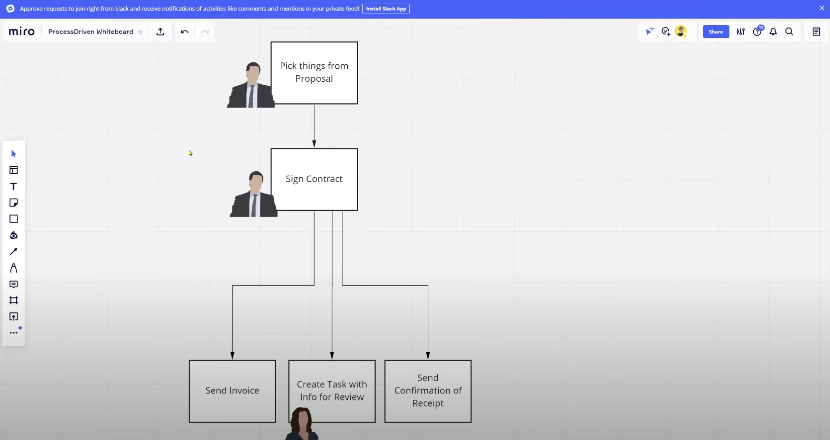
First things first: map out your workflow. This important, because automating a workflow that isn’t perfected can get messy!
For the sake of this Integromat example, here’s the workflow we’re mapping out today:
- Your client chooses a package from your proposal
- They sign the contract
- They receive an invoice
- A task is created internally inside ClickUp so you don’t miss it
- The client receives a confirmation email
Layla explains mapping out your workflow starting at 0:40
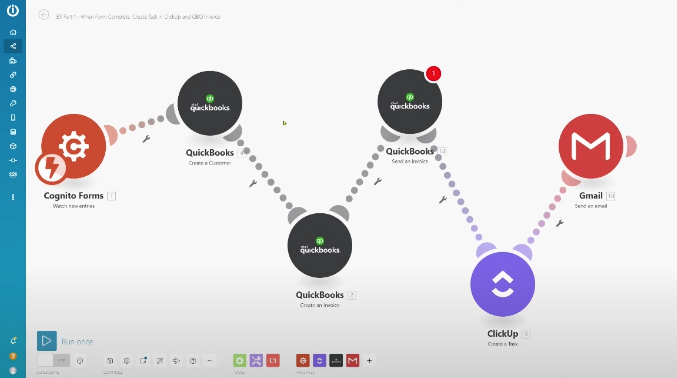
Connecting Integromat with Cognito Forms, QuickBooks, ClickUp and Gmail
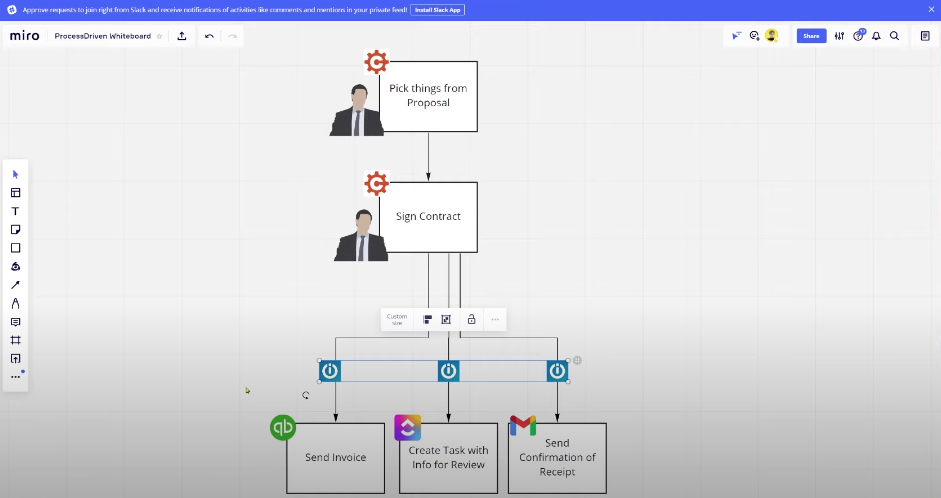
Now that you have mapped out your workflow, you’ll want to assign your tools to each step of the workflow.
As you can see in the image above, we have symbols to represent how our tech stack will flow with each of these steps (but that’s really for clarification in this video).
Curious about our tech stack? Learn about our favorites and how to organize them here: How to Organize Your Software Database in ClickUp
It might be different for you, but here are the tools we currently use that would apply here:
- We’d use Cognito Forms to set up the form
- Quickbooks would let us create and send the invoice
- ClickUp would house the task that keeps our team updated on what’s going on with each client
- Gmail would send the client their confirmation reciept
Layla explains how and why we chose these tools starting at 2:02
Build out a form using Cognito Forms
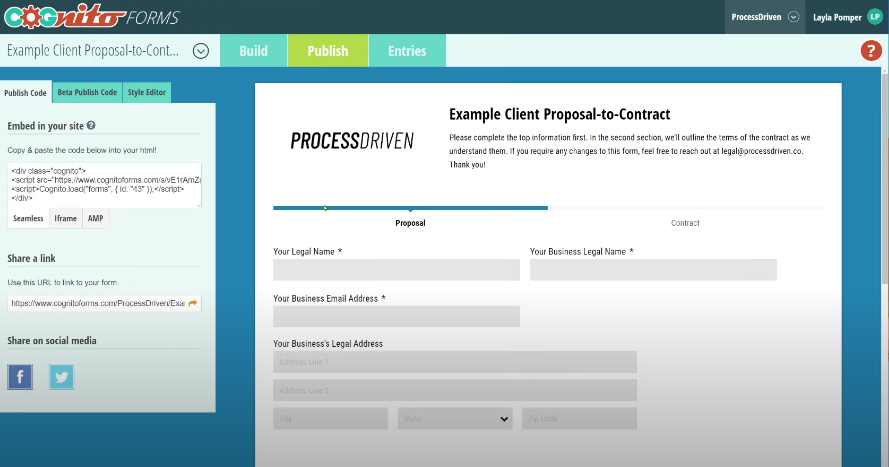
To kick off this workflow, you’ll want to build out a form using Cognito Forms.
This will give clients the ability to sign your contract and jump-start the rest of your process.
Depending on the level of complexity in your initial client onboarding, Cognito Forms gives you the ability to make things as detailed or as simple as you would like.
You’ll want to include important factors you need later on down the workflow, such as the price, name, email address, and so on. In this scenario, it’s important to include the price so QuickBooks connection with Integromat, will know how much to invoice them for in this new automation.
Layla explains Cognito Forms starting at 2:49
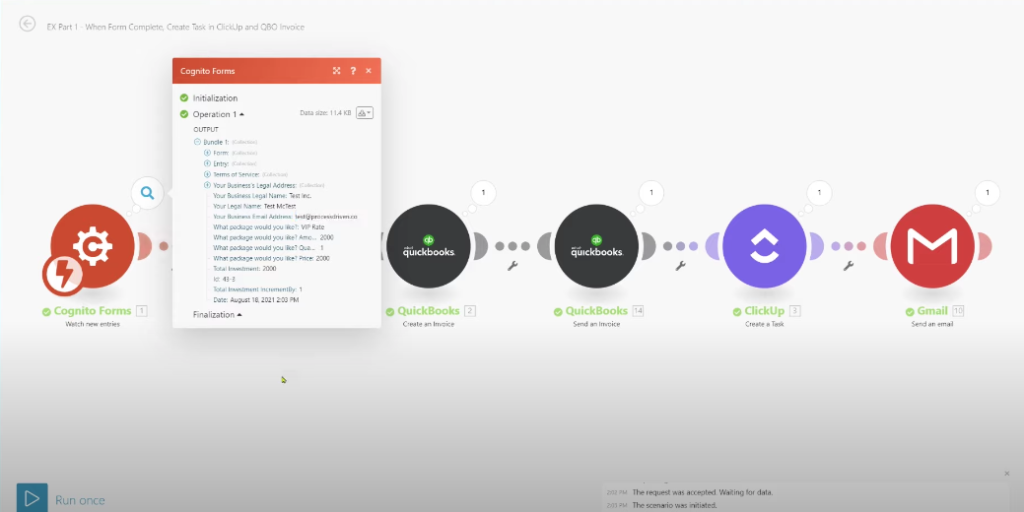
Connecting Cognito Forms and Integromat Example
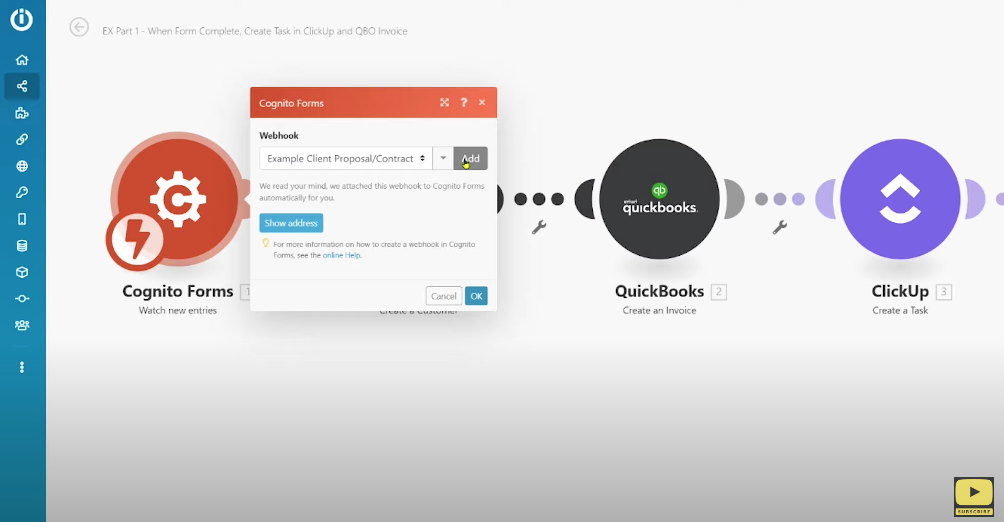
Now that you have your forms ready to go, it’s time to connect the first steps inside of Integromat.
You’ll want to create a webhook inside of Integromat (It’s super simple, we promise!). From there, it will allow you to pick the exact form you want it to use to create the next automation.
The lightning bolt you see in the image above is the scheduling of new “scans” of sorts. Basically, “How often do you want Integromat to watch for this new incoming Cognito Form?” We’ve chosen to have ours be automatic, or rather “watch it all the time”, so the scenario in Integromat in this example would kick off as soon as the form is submitted. Just know you can adjust the timing from there.
Layla explains in detail starting at 4:17
Creating an invoice using QuickBooks and Integromat Example
Now you have your form ready to automate, but what do you want to put into Quickbooks?
Essentially, with Integromat, you are able to pull in all the forms or data that Cognito Forms is collecting and be able to put that customer into your QuickBook account.
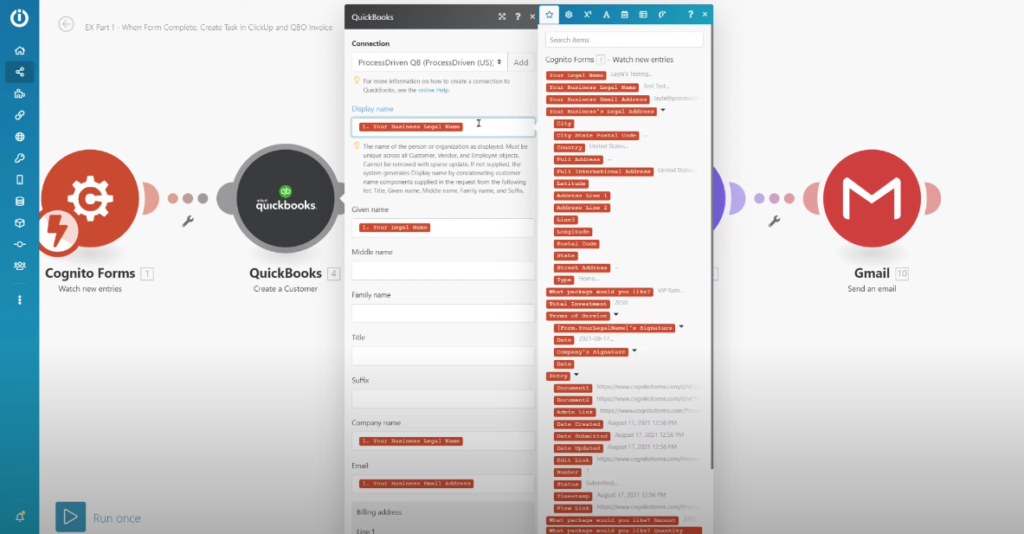
To add this step, link QuickBooks to Integromat (again, they walk through all the steps here!) and select “Create a Customer”.
Here’s a quick overview of where each piece of information should live:
- Display name equals business’s legal name
- Given name is the contact
- Company name is the legal name again
- Email address is the customer’s email address
- And so on.
You can map as many of these custom fields as necessary for your client onboarding process, but for the sake of this Integromat example, we’ll stop there.
Now that a customer has been created, let’s “Create an Invoice”.
Once again, Integromat needs to know what to do with all this information it’s received from QuickBooks, and where to put it.
Here’s what we implemented, for the sake of this example:
- Customer: well, the customer you just created!
- Price: we’re only offering one package in this Integromat example, so we’re going with that total package cost
- Description: the package name
- Quantity: in this scenario, we know we’re only going to sell one of these packages, so we’re going to manually enter “1”
- And so on.
Again, you can add multiple custom fields here that fit your need for information depending on your client onboarding process.
Layla shows you how to create the invoice starting at 5:44
Sending an invoice using QuickBooks and Integromat
So if you’ve made it this far, and you should have:
- Collected a bunch of information using Cognito Forms
- A contract signed by the client
- A customer created in QuickBooks
- And an invoice created in QuickBooks
Now we need to have Integromat automatically send an invoice to the new client. (Because what’s the point of creating an invoice if we’re don’t intend on sending it!)
This is done by adding another QuickBooks pit stop or “module” to your Integromat scenario, and prompting it to “Send an Invoice”.
Pro tip: Integromat will alert you when you’re missing a step in a module with the little red dot icon. When you see that, you’ll know it’s missing an automation!
Here we need the invoice ID (the one we just created) and the email address for the new client we’re onboarding.
Layla shows you how to create an invoice using Quickbooks starting at 8:47
Integromat Example: Automatically Create a Task in ClickUp
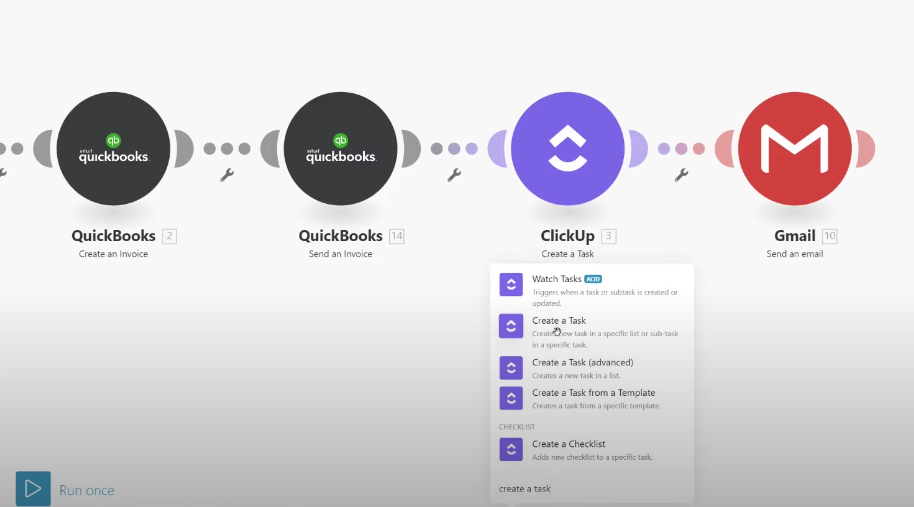
As we get to the end of the workflow, you’ll now want to make sure Integromat creates a task in your workspace to alert you that you have a new customer.
This bridges the gap between the offers you are selling and the fulfillment side of your business
When creating this piece of the scenario, you can choose the Task name and which Space/Folder/List you want the task to go to.
Then, we’re adjusting the ClickUp Custom Fields. (What are ClickUp Custom Fields, you ask? Find out here.)
One of the main reasons we love using Integromat vs. Zapier is because Integromat and ClickUp play really well together. If you’re going to become a ClickUp Power User, you’re most likely going to become a raving fan of Integromat as well.
In the Integromat vs. Zapier debate, ClickUp takes the cake here for a lot of reasons: but the main winning point? Integromat’s connection to Custom Fields inside ClickUp.
From here, you can fill out the Custom Fields accordingly. (While keeping in mind that fields that use to start for instance at, “Proposal Received” should now actually start at “Invoice Sent” – thanks to your new Integromat automation.)
Layla shows you how to create a task and edit custom fields right in clickup using Integromat starting at 10:27
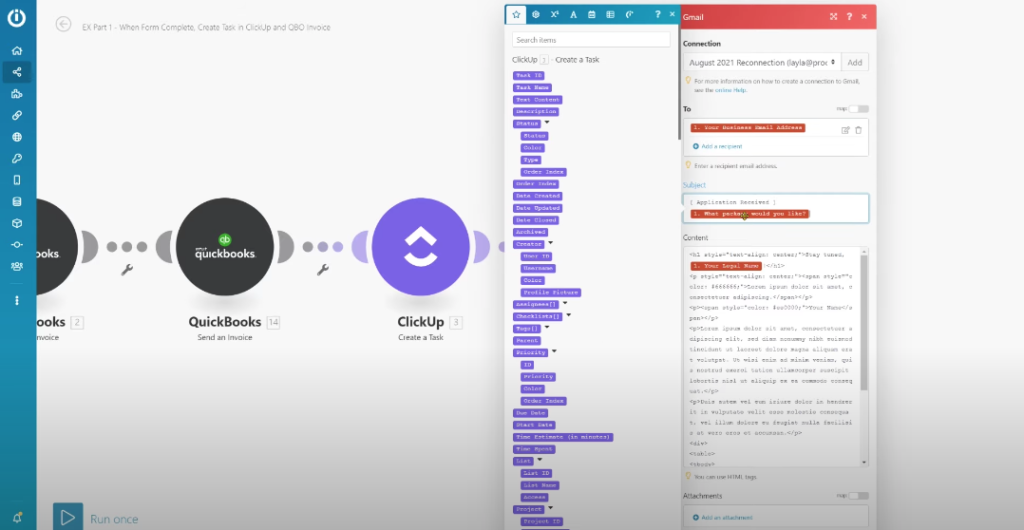
Sending an automated email using Gmail and Integromat Example
We’ve made it to the final step!
We’ve “walked” our client through the onboarding process, and now we want to send something to your client to say you’ve received their information and you’re excited to get started.
For this example, we’re going to pretend you are sending it personally through Gmail versus your email marketing software. (But there are modules to connect pretty much any other email tool to any Integromat scenario!)
To format an email sent directly from our Gmail, we add the Gmail module and select “Send an Email”, then we fill out the form as necessary.
- To is again, who we’re sending the email to (our new client in this case)
- The subject can be filled with both typed information and some dynamic fields (such as “name”, etc.)
- The body of the email
Note: when you send an email from Integromat, it shows up as a plain text email. Which is.. not ideal. If you want to make your emails look better than just plain text, such as by adding in a logo, for example, use HTML formatting instead.
Get caught up on part one of setting these up, here: Integromat Tutorial – How to leave Dubsado for good!
Once you write the body of the email and fill in the necessary details, click “Ok” and you are ready to go.
Layla shows you how to send an automated email using Gmail and Integromat at 13:19
Testing your newly built Integromat client onboarding scenario
You finally have everything mapped out and it’s time to give it a test run. You’ll first want to hit the “on button” in the bottom left corner to get the workflow active.
Head over to Cognito Forms and fill it out as a test run to get Integromat’s gears turning. You should be able to see it happen on Integromat’s end to watch it go through the steps.
Just to be sure, it is also a good idea to double-check that everything worked inside of the software you’re using for each step. That way, you can be sure the automation is working together so that you have a perfectly automated workflow.
You did it! Welcome to your new streamlined client onboarding process.
Layla shows you how to test it starting at 15:09

ProcessDriven helps small teams turn chaos into process. The ProcessDriven Approach™️ combines software expertise with practical process-first strategies that have helped 1,600+ teams build a scalable foundation of business systems.