This post contains affiliate links or sponsored content for which we may receive compensation. For details, visit https://processdriven.co/terms
Build a Process Map with Just Four Shapes (01:35)
Shapes are the basis of our process mapping vocabulary, or symbolism, as is the case. There are only four to remember (we told you this was easy!).
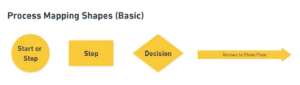
- Circle –the starting and stopping points of your service.
- Square or Rectangle – an action or step in the process, one step per square.
- Diamond – a decision or checkpoint that determines what happens next.
- Arrows – shows the flow direction.
How to Create a Process Map
If you’ve mastered the four shapes above, we’re ready to begin.
Step 1: Define the Start and the Stop Points (timestamp 03:20)
The first circle on your process map indicates the start of your service. When does your customer become a customer? It could be when they sign a contract, schedule an appointment, or place an online order. If you think of a process map like a board game, this first circle is Start.
The second circle is the finish line. When is the customer journey complete? This might occur upon service termination, product delivery, or final invoice.
Step 2: Outline the Process from Beginning to End (04:40)
We now need to get from Start to Finish. To do that, we need to know what happens next. Starting from that first circle, when your customer becomes a customer, what happens to move them forward?
In a board game, this would be rolling the dice to determine where to move our piece. If the starting point for your offer is a customer order, then the next step might be sending an order confirmation email. Using our one step per square rule, begin mapping each action working towards the end.
Our customer journey will eventually reach a fork in the road. These branches are indicated by diamonds on the map. Let’s say our customer created an account, placed their order, and received an email, but payment was rejected. We can retry the transaction, and maybe this time it goes through, so the fulfillment team is notified, or if it doesn’t, we can cancel the order and request the customer update their payment method. A diamond is like drawing a card. You can move ahead three spaces or get sent back to start.
Pro Tip: It’s good to stick to common scenarios rather than mapping for every possible contingency. This keeps your process map streamlined and easy to follow.
Step 3 Add a Swimlane for Tracking (timestamp 08:20)
You can add horizontal lines known as Swimlanes to your process map flow chart to help organize and track information. Some aspects we might want to track throughout our process could include customer engagement, departmental ownership, software transitions, or whatever area you’re looking to optimize. Reorganizing existing map information in this fashion gives stakeholders a clear view of key roles and responsibilities.
Step 4 Turn the Process Map into a Task List (timestamp 10:00)
Now that we’ve mapped the process, we can put it to work for us. The easiest way to do this is by turning our steps into action items and adding them to a task checklist. Wherever you track your tasks, whether it’s a spreadsheet, document, or work management software, create a task for each step that requires an action. Don’t include automated steps, but anything that requires human intervention. While the map shows the big picture, which is excellent for sharing with stakeholders and training new team members, a comprehensive task list ensures that no step is overlooked.
Step 5 Create Templates (timestamp 12:15)
Our final step is replication. Whether you create a digital template or a printable file, use your task list every time the process starts. It’s an easy way to reduce the chance of error and ambiguity, and you can relax knowing that your customers are delighted by reliable, consistent service.
Pro Tip: If you love the ease of templates, visit today’s sponsor TextExpander. With TextExpander you can save and insert content almost anywhere with custom shortcuts. One of our favorite time-saving features is TextExpander’s Public Snippet library for social media post templates! Be sure to check them out.
Process mapping can add value in many areas. An essential part of business process documentation, maps communicate a process to teams and shareholders, make helpful training materials, and can measure the efficiency of a new process.
If you like learning about human-centered business processes, systems, and software, subscribe to the ProcessDriven YouTube channel and learn to enjoy the process!